2. Getting Started with BigDAWG
This section describes how to start a BigDAWG cluster, load an example dataset, and run several example queries.
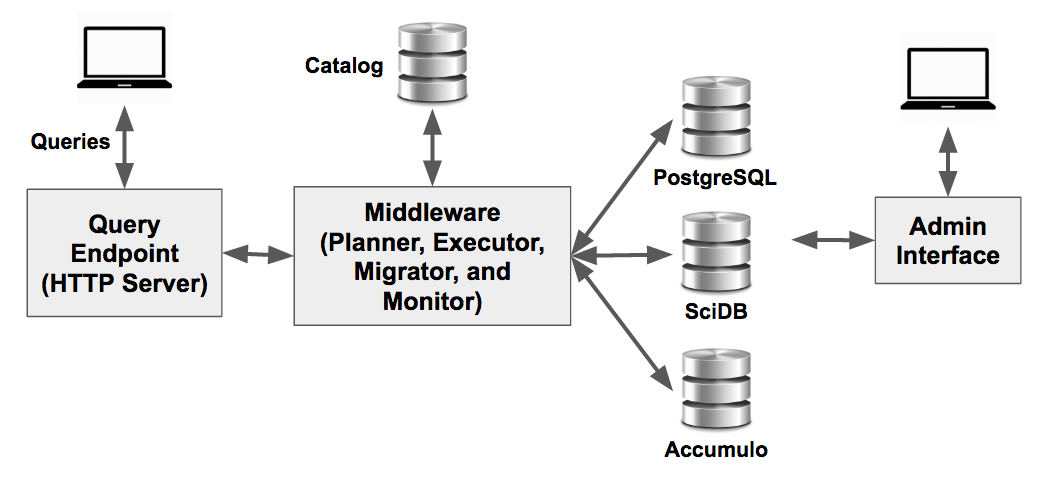
BigDAWG Cluster Components
A BigDAWG cluster consists of the Middleware, Query Endpoint, Catalog, and multiple database engines. You can learn more about these components in the BigDAWG Middleware Internal Components section.
The purpose of this section is to guide you through the process of setting up a BigDAWG cluster with Docker, the open-source technology that allows you to deploy applications inside software containers. You will pull baseline images from our Dockerhub repository, run images as instantiated containers, and then run scripts to populate the engines with test data. The current release of BigDAWG includes images for PostgreSQL, SciDB, and Accumulo.
A video demonstration of these steps is also available to watch.
2.1. Prerequisites
To complete this guide, you will need basic knowledge of working with your computer’s command prompt/terminal, Docker, and Linux commands. You will also need your computer’s port 8080 available and will need administrator privileges on your system to install Docker.
Compatible Docker Installation
To follow the steps in this section, you will need to first install Docker on your system. If your system is running Mac OSX or Windows, you should install Docker Toolbox. Follow the download and installation steps from the Docker website.
Note
BigDAWG has been tested on these versions of Docker:
- Docker version 1.11.1, build 5604cbe (Tested on Ubuntu 14.04)
- Docker version 1.12.1, build 6f9534c (Tested on Docker Toolbox for Mac, version 0.8.1, build 41b3b25)
- Docker version 1.12.6, build 78d1802 (Tested on Docker Toolbox for Mac)
Note
Do not use “Docker for Mac” or “Docker for Windows”, which are two alternative Docker applications, because of known networking limitations that interfere with this example. If your system is runnig Linux, then install Docker for Linux.
BigDAWG source code
Obtain the source code by cloning the git repository:
git clone https://github.com/bigdawg-istc/bigdawg.git
Alternatively, download the code directly from the website https://github.com/bigdawg-istc/bigdawg.git
2.2. BigDAWG Cluster Setup Steps
(Mac and Windows only) Open a Quickstart Terminal to Execute Docker Commands
Launch the Docker Quickstart Terminal application, which was installed when installing Docker Toolbox (this initialization can take some time). Launching this application will run a Docker host VM and open an initialized terminal window. Without this terminal, you will not be able to execute docker commands.
Docker Quickstart Terminal Successfully Initialized
The status shown above means that Docker was started successfully.
Navigate to the “provisions” directory of the source code root
The source code root is a directory called “bigdawg”. All scripts executed in this tutorial assume that you are in the bigdawg/provisions directory.
Run the Docker setup script:
./setup_bigdawg_docker.sh
This script take will start a BigDAWG cluster using Docker containers. It can take up to 15-30 minutes to complete depending on your computer resources and internet connection. The script works in the following stages:
- Create a Docker network called
bigdawgthat allows the containers to communicate with each other. - Pull “base” docker images from Docker Hub that encapsulate the database engines but contain no data.
- Run the images as instantiated containers.
- Download publically-available MIMIC II data. The BigDAWG project does not ship with any of data itself, so all data is downloaded from external sources.
- Execute scripts on the contianers to insert data into the engines.
- Start the BigDAWG Middleware on each container, and accept queries on the
bigdawg-postgres-catalogcontainer.
After the setup script completes, you will get a message:
Starting HTTP server on: http://bigdawg-postgres-catalog:8080/bigdawg/
2017-03-21 14:17:01,873 2767 istc.bigdawg.network.NetworkIn.receive(NetworkIn.java:39) [pool-2-thread-1] null DEBUG istc.bigdawg.network.NetworkIn - tcp://*:9991
2017-03-21 14:17:02,072 2966 istc.bigdawg.network.NetworkIn.receive(NetworkIn.java:43) [pool-2-thread-1] null DEBUG istc.bigdawg.network.NetworkIn - Wait for the next request from a client ...
Mar 21, 2017 2:17:23 PM org.glassfish.grizzly.http.server.NetworkListener start
INFO: Started listener bound to [bigdawg-postgres-catalog:8080]
Jersey app started with WADL available at http://bigdawg-postgres-catalog:8080/bigdawg/application.wadl
Hit enter to stop it...
If you hit any key, the Middleware execution will quit. Therefore, make sure to run any additional commands in a separate termainal window.
Optional setup verification
As an optional step, you can verify that the images were pulled successfully and check their running status.
To do this, create a separate Docker Quickstart terminal and run the following commands:
Check the status of all images:
docker images
user@local:~$ docker images
REPOSITORY         TAG      IMAGE ID       CREATED          SIZE
bigdawg/accumulo   latest   804fa44f5eb4   2 seconds ago    1.656 GB
bigdawg/scidb      latest   c1b578c504bb   8 seconds ago    1.237 GB
bigdawg/postgres   latest   1a2600f05cbb   12 seconds ago   1.086 GB
You should see the three images as shown above if the pull (phase 2 above) was successful.
Check the status of all running containers:
docker ps
user@local:~$ docker ps
CONTAINER ID   IMAGE              STATUS        PORTS                                              NAMES
ef66f13c4694   bigdawg/accumulo   Up 1 minute   0.0.0.0:42424->42424/tcp                           bigdawg-accumulo-proxy
3e02a26c9da5   bigdawg/accumulo   Up 1 minute   0.0.0.0:9999->9999/tcp, 0.0.0.0:50095->50095/tcp   bigdawg-accumulo-master
13deae26bff7   bigdawg/accumulo   Up 1 minute   0.0.0.0:9997->9997/tcp                             bigdawg-accumulo-tserver0
c6e6b8185d7f   bigdawg/accumulo   Up 1 minute   0.0.0.0:2181->2181/tcp                             bigdawg-accumulo-zookeeper
7d3135d17a7e   bigdawg/accumulo   Up 1 minute                                                      bigdawg-accumulo-namenode
3b1710639c09   bigdawg/scidb      Up 1 minute   0.0.0.0:1239->1239/tcp                             bigdawg-scidb-data
4d119d50458c   bigdawg/postgres   Up 1 minute   0.0.0.0:5402->5402/tcp                             bigdawg-postgres-data2
626ba8425e5b   bigdawg/postgres   Up 1 minute   0.0.0.0:5401->5401/tcp                             bigdawg-postgres-data1
e4fe27b0c8ed   bigdawg/postgres   Up 1 minute   0.0.0.0:5400->5400/tcp, 0.0.0.0:8080->8080/tcp     bigdawg-postgres-catalog
You should see all the containers running as shown above if the run (phase 3 above) was successful.
2.3. Run Example Queries
Warning
These commands will not work if you are using a VPN connection or cannot access the Docker host IP address. If VPN is necessary for your system, contact us for tips that you may be able to use to work around this.
Warning
Your system must have port 8080 available for the Middleware to initialize successfully.
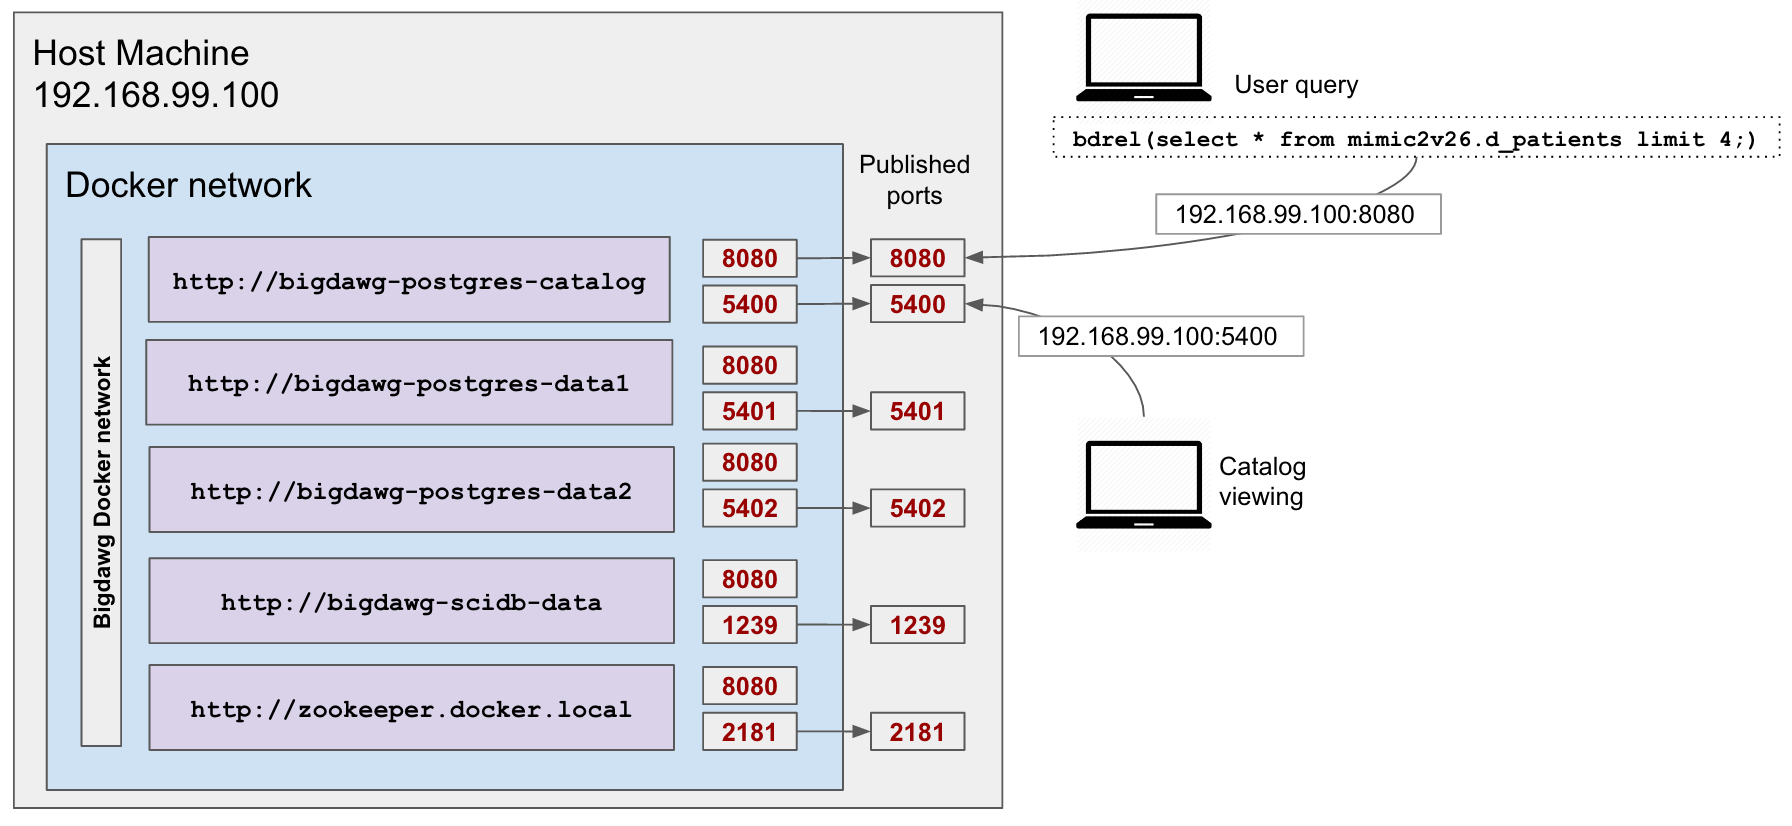
Once the containers are running, the Catalog container will run the Query Endpoint (a simple HTTP server) listening on port 8080. The container is configured to publish its port 8080 to the Docker VM’s port 8080, so that queries sent to that port will be routed to the Query Endpoint. You can then submit queries to this port like so:
$ curl -X POST -d "bdrel(select * from mimic2v26.d_patients limit 4;)" http://192.168.99.100:8080/bigdawg/query/
Here, we are using curl, a shell command, to handle requests and responses to and from a web server, in this case the Query Endpoint, over the HTTP protocol.
2.3.1. Example Queries
In this section, we describe a few queries on the MIMIC II dataset that you can execute once you have successfully completed the above steps.
All queries use the following syntax:
$ curl -X POST -d "<query-goes-here>" http://192.168.99.100:8080/bigdawg/query/
We are making a POST request to send the query string as data to the Query Endpoint at the resource /bigdawg/query/. The IP address 192.168.99.100 is used by the Docker host VM, which is forwarding its port 8080 to the container running the Query Endpoint.
1) postgres only
bdrel(select * from mimic2v26.d_patients limit 4)
This query uses the relational island (bdrel) to select 4 entries from the table mimic2v26.d_patients.
Here is the full curl command:
curl -X POST -d "bdrel(select * from mimic2v26.d_patients limit 4;)" http://192.168.99.100:8080/bigdawg/query/
2) scidb only
bdarray(filter(myarray,dim1>150))
This query uses the array island (bdarray) to filter all entries in the array myarray with dim1 greater than 150. Note The SciDB connector is in beta mode.
Here is the full curl command:
curl -X POST -d "bdarray(filter(myarray,dim1>150));" http://192.168.99.100:8080/bigdawg/query/
3) accumulo only
bdtext({ 'op' : 'scan', 'table' : 'mimic_logs', 'range' : { 'start' : ['r_0001','',''], 'end' : ['r_0015','','']} })
This query uses the text island (bdtext) to scan all entries in the Accumulo table mimic_logs with row keys between r_0001 and r_00015.
Here is the full curl command:
curl -X POST -d "bdtext({ 'op' : 'scan', 'table' : 'mimic_logs', 'range' : { 'start' : ['r_0001','',''], 'end' : ['r_0015','','']} });" http://192.168.99.100:8080/bigdawg/query/
4) postgres to postgres
bdrel(select * from mimic2v26.additives,mimic2v26.admissions where mimic2v26.additives.subject_id=mimic2v26.admissions.subject_id limit 10)
This query joins data stored in two seperate postgres instances. Essentially, the tables mimic2v26.additives,mimic2v26.admissions are split among two different postgres instances.
Here is the full curl command:
curl -X POST -d "bdrel(select * from mimic2v26.additives,mimic2v26.admissions where mimic2v26.additives.subject_id=mimic2v26.admissions.subject_id limit 10;)" http://192.168.99.100:8080/bigdawg/query/
5) scidb to postgres
bdrel(select * from bdcast( bdarray(filter(myarray,dim1>150)), tab6, '(i bigint, dim1 real, dim2 real)', relational))
This query moves data from scidb to postgres. The bdarray() portion of the query filters all entries in the scidb array myarray with dim1>150. The bdcast() portion of the query tells the middleware to migrate this resultant array to a table called tab6 with schema (i bigint, dim1 real, dim2 real) to a database in the relational island. The final bdrel() portion of the query selects all entries from this resultant table in postgres.
Here is the full curl command:
curl -X POST -d "bdrel(select * from bdcast( bdarray(filter(myarray,dim1>150)), tab6, '(i bigint, dim1 real, dim2 real)', relational))" http://192.168.99.100:8080/bigdawg/query/
6) postgres to scidb
bdarray(scan(bdcast(bdrel(SELECT poe_id, subject_id FROM mimic2v26.poe_order LIMIT 5), poe_order_copy, '<subject_id:int32>[poe_id=0:*,10000000,0]', array)))
This query moves data from postgres to scidb. The bdrel() portion of the array selects the columns poe_id, subject_id FROM mimic2v26.poe_order. The bdcast() portion of the query tells the middleware to migrate this data to an array called poe_order_copy with schema <subject_id:int32>[poe_id=0:*,10000000,0] in the array island. The final bdarray() portion of the query scans this resultant array in scidb. Note The SciDB connector is in beta mode. We are having some problems with the current SciDB JDBC connector in which delivery of result arrays where dimensions span more than one chunk can lead to an error.
Here is the full curl command:
curl -X POST -d "bdarray(scan(bdcast(bdrel(SELECT poe_id, subject_id FROM mimic2v26.poe_order LIMIT 5), poe_order_copy, '<subject_id:int32>[poe_id=0:*,10000000,0]', array)));" http://192.168.99.100:8080/bigdawg/query/
7) accumulo to postgres
bdrel(select * from bdcast(bdtext({ 'op' : 'scan', 'table' : 'mimic_logs', 'range' : { 'start' : ['r_0001','',''], 'end' : ['r_0020','','']} }), tab1, '(cq1 text, mimic_text text)', relational))
This query moves data from accumulo to postgres. The bdtext() portion of the query scans the accumulo table mimic_logs from row keys r_0001 to r_00020. The bdcast() portion of the query tells the middleware to migrate these resultant key-value pairs to a table called tab1 with schema (cq1 text, mimic_text text) in the relational island. The final bdrel() portion of the query selects all entries from this resultant table.
Here is the full curl command:
curl -X POST -d "bdrel(select * from bdcast(bdtext({ 'op' : 'scan', 'table' : 'mimic_logs', 'range' : { 'start' : ['r_0001','',''], 'end' : ['r_0020','','']} }), tab1, '(cq1 text, mimic_text text)', relational))" http://192.168.99.100:8080/bigdawg/query/
8) postgres to accumulo
bdtext({ 'op' : 'scan', 'table' : 'bdcast(bdrel(select * from mimic2v26.icd9 limit 4), res, '', text)'})
This query moves data from postgres to accumulo. The bdrel() portion of the query select 4 entries from the table mimic2v26.icd9. The bdcast() portion of the query tells the middleware to migrate these entries to a text island table called res. Finally, the bdtext() portion of hte array scans this resultant table.
Here is the full curl command:
curl -X POST -d "bdtext({ 'op' : 'scan', 'table' : 'bdcast(bdrel(select * from mimic2v26.icd9 limit 4), res, '', text)'})" http://192.168.99.100:8080/bigdawg/query/
2.4. Output Logs
All logging is saved to a Postgres database called logs which resides on the bigdawg-postgres-catalog container. You can attach to the container by running the following Docker command in a separate Quickstart Terminal:
user@local:~$ docker exec -it bigdawg-postgres-catalog bash
postgres@bigdawg-postgres-catalog:/$
This command will attach to the bigdawg-postgres-catalog container, and logs you in as the user postgres, so you can execute psql queries from there.
postgres@bigdawg-postgres-catalog:/$ psql
psql (9.4.10)
Type "help" for help.

postgres=# \l
                                 List of databases
      Name       |  Owner   | Encoding | Collate |  Ctype  |   Access privileges
-----------------+----------+----------+---------+---------+-----------------------
 bigdawg_catalog | postgres | UTF8     | C.UTF-8 | C.UTF-8 |
 bigdawg_schemas | postgres | UTF8     | C.UTF-8 | C.UTF-8 |
 logs            | pguser   | UTF8     | C.UTF-8 | C.UTF-8 |
 postgres        | postgres | UTF8     | C.UTF-8 | C.UTF-8 |
 template0       | postgres | UTF8     | C.UTF-8 | C.UTF-8 | =c/postgres          +
                 |          |          |         |         | postgres=CTc/postgres
 template1       | postgres | UTF8     | C.UTF-8 | C.UTF-8 | =c/postgres          +
                 |          |          |         |         | postgres=CTc/postgres
(6 rows)

postgres=# \c logs
You are now connected to database "logs" as user "postgres".

logs=# SELECT * FROM logs LIMIT 5;
 id | user_id |          time           |          logger          | level |                 message
----+---------+-------------------------+--------------------------+-------+------------------------------------------
  1 |         | 2017-03-21 20:36:11.342 | istc.bigdawg.LoggerSetup | INFO  | Logging was configured!
  2 |         | 2017-03-21 20:36:11.427 | istc.bigdawg.Main        | INFO  | Starting application ...
  3 |         | 2017-03-21 20:36:11.435 | istc.bigdawg.Main        | INFO  | Connecting to catalog
  4 |         | 2017-03-21 20:36:11.452 | istc.bigdawg.Main        | INFO  | Checking registered database connections
  5 |         | 2017-03-21 20:36:11.601 | istc.bigdawg.Main        | DEBUG | args 0: bigdawg-scidb-data
(5 rows)

logs=# \q
postgres@bigdawg-postgres-catalog:/$ exit
user@local:~$
The \q command exits psql and returns you to the bigdawg-postgres-catalog container’s shell. The subsequent exit command returns you to your local system shell.
2.4.1. Exporting logs
You can also dump the logs from the container into a text file on your local system with the following command:
docker exec -it bigdawg-postgres-catalog pg_dump -a -d logs -t logs > logs.txt
This will write the contents of the logs table of the logs database to a file called logs.txt on your local system.
2.5. Viewing the Catalog
You may view the contents of the Catalog database by sending queries to the Query Endpoint using the bdcatalog() syntax.
As an example, you may view the engines table of the Catalog database by executing the following:
curl -X POST -d "bdcatalog(select * from catalog.engines);" http://192.168.99.100:8080/bigdawg/query/

eid name          host                     port  connection_properties
0   postgres0     bigdawg-postgres-catalog 5400  PostgreSQL 9.4.5
1   postgres1     bigdawg-postgres-data1   5401  PostgreSQL 9.4.5
2   postgres2     bigdawg-postgres-data2   5402  PostgreSQL 9.4.5
3   scidb_local   bigdawg-scidb-data       1239  SciDB 14.12
4   saw ZooKeeper zookeeper.docker.local   2181  Accumulo 1.6
See the Catalog Manipulation section for more details about the query language, and see the Catalog section for more details about the contents and purpose of the Catalog.
2.6. Shutdown
When finished, stop and remove the containers:
./cleanup_containers.sh
Stopping a container means that the container ceases execution, but is still visible in the docker ps -a output list. Removing a container deletes all additional filesystem layers added to the associated image. In either case, the image is still present on your system, so that it doesn’t need to be pulled from the Docker repository again.
After stopping and removing, you must run the ./setup_bigdawg_docker.sh script to start the BigDAWG cluster again.
Additionaly, if you’re using Docker Toolbox, you can stop the VM running Docker with the following command:
docker-machine stop default
2.7. Docker Networking and Container Reference
Docker Networking Configuration
Below is a list of the Docker containers and the primary functions they serve:
- bigdawg-postgres-catalog
- Runs the Catalog, Middleware, and Query Endpoint. The Query Endpoint listens for queries on
bigdawg-postgres-catalogand port8080 - bigdawg-postgres-data1
- Runs PostgreSQL loaded with the MIMIC II patient dataset
- bigdawg-postgres-data2
- Runs PostgreSQL loaded with a copy of the Mimic II patient dataset. Used for demonstrating migration between 2 PostgreSQL instances
- bigdawg-scidb
- Runs SciDB with MIMIC II waveform data
- Accumulo containers: several containers support the Accumulo stack:
- bigdawg-accumulo-master: Master server bigdawg-accumulo-tserver0: Handles client reads and writes bigdawg-accumulo-zookeeper bigdawg-accumulo-namenode bigdawg-accumulo-proxy
In order for the containers to communicate with each other, they are connected to a Docker network named bigdawg, which was created with the docker network create command. In addition, each container exposes any required ports for other containers to connect to and publishes ports, which makes them available to both other containers and the Docker Host. This is all handled by the startup scripts above.
Below is a listing of the ports published by each container.
- hostname: bigdawg-postgres-catalog
- port 5400 for postgres, 8080 for accepting bigdawg queries
- hostname: bigdawg-postgres-data1
- port 5401 for postgres
- hostname: bigdawg-postgres-data2
- port 5402 for postgres
- hostname: bigdawg-scidb
- port 1239 for scidb, 49901 for ssh
- hostname: accumulo-data-master
- port 9999 for Master thrift server, 50095 for Monitor service
- hostname: accumulo-data-tserver0
- port 9997 for TabletServer thrift server
- hostname: accumulo-data-tserver1
- (no ports)
- hostname: accumulo-data-zookeeper
- port 2181 for zookeeper client connections
- hostname: accumulo-data-namenode
- (no ports)
- hostname: accumulo-data-proxy
- (no ports)
If using docker-toolbox, the Docker Host will have IP address 192.168.99.100, which you can check using this command:
$ docker-machine ip default
> 192.168.99.100
Otherwise, if on Linux, the Docker Host IP is your own localhost IP.
2.8. MIMIC II dataset
For the above examples, we are using data collected by the PhysioNet group (https://physionet.org/mimic2/). While we are only leveraging data the unrestricted parts of the data that do not require registration, we recommend you take a look at Getting Access to the Full Dataset . Also, if you are using any of their data in your results, please be sure to cite them appropriately.
2.9. Install the Administrative Web Interface
A very basic administrative web interface is included with this release, which will let you see the status of the BigDAWG cluster of databases, start and stop containers, and view the Catalog objects table.
You can view a video demonstration here
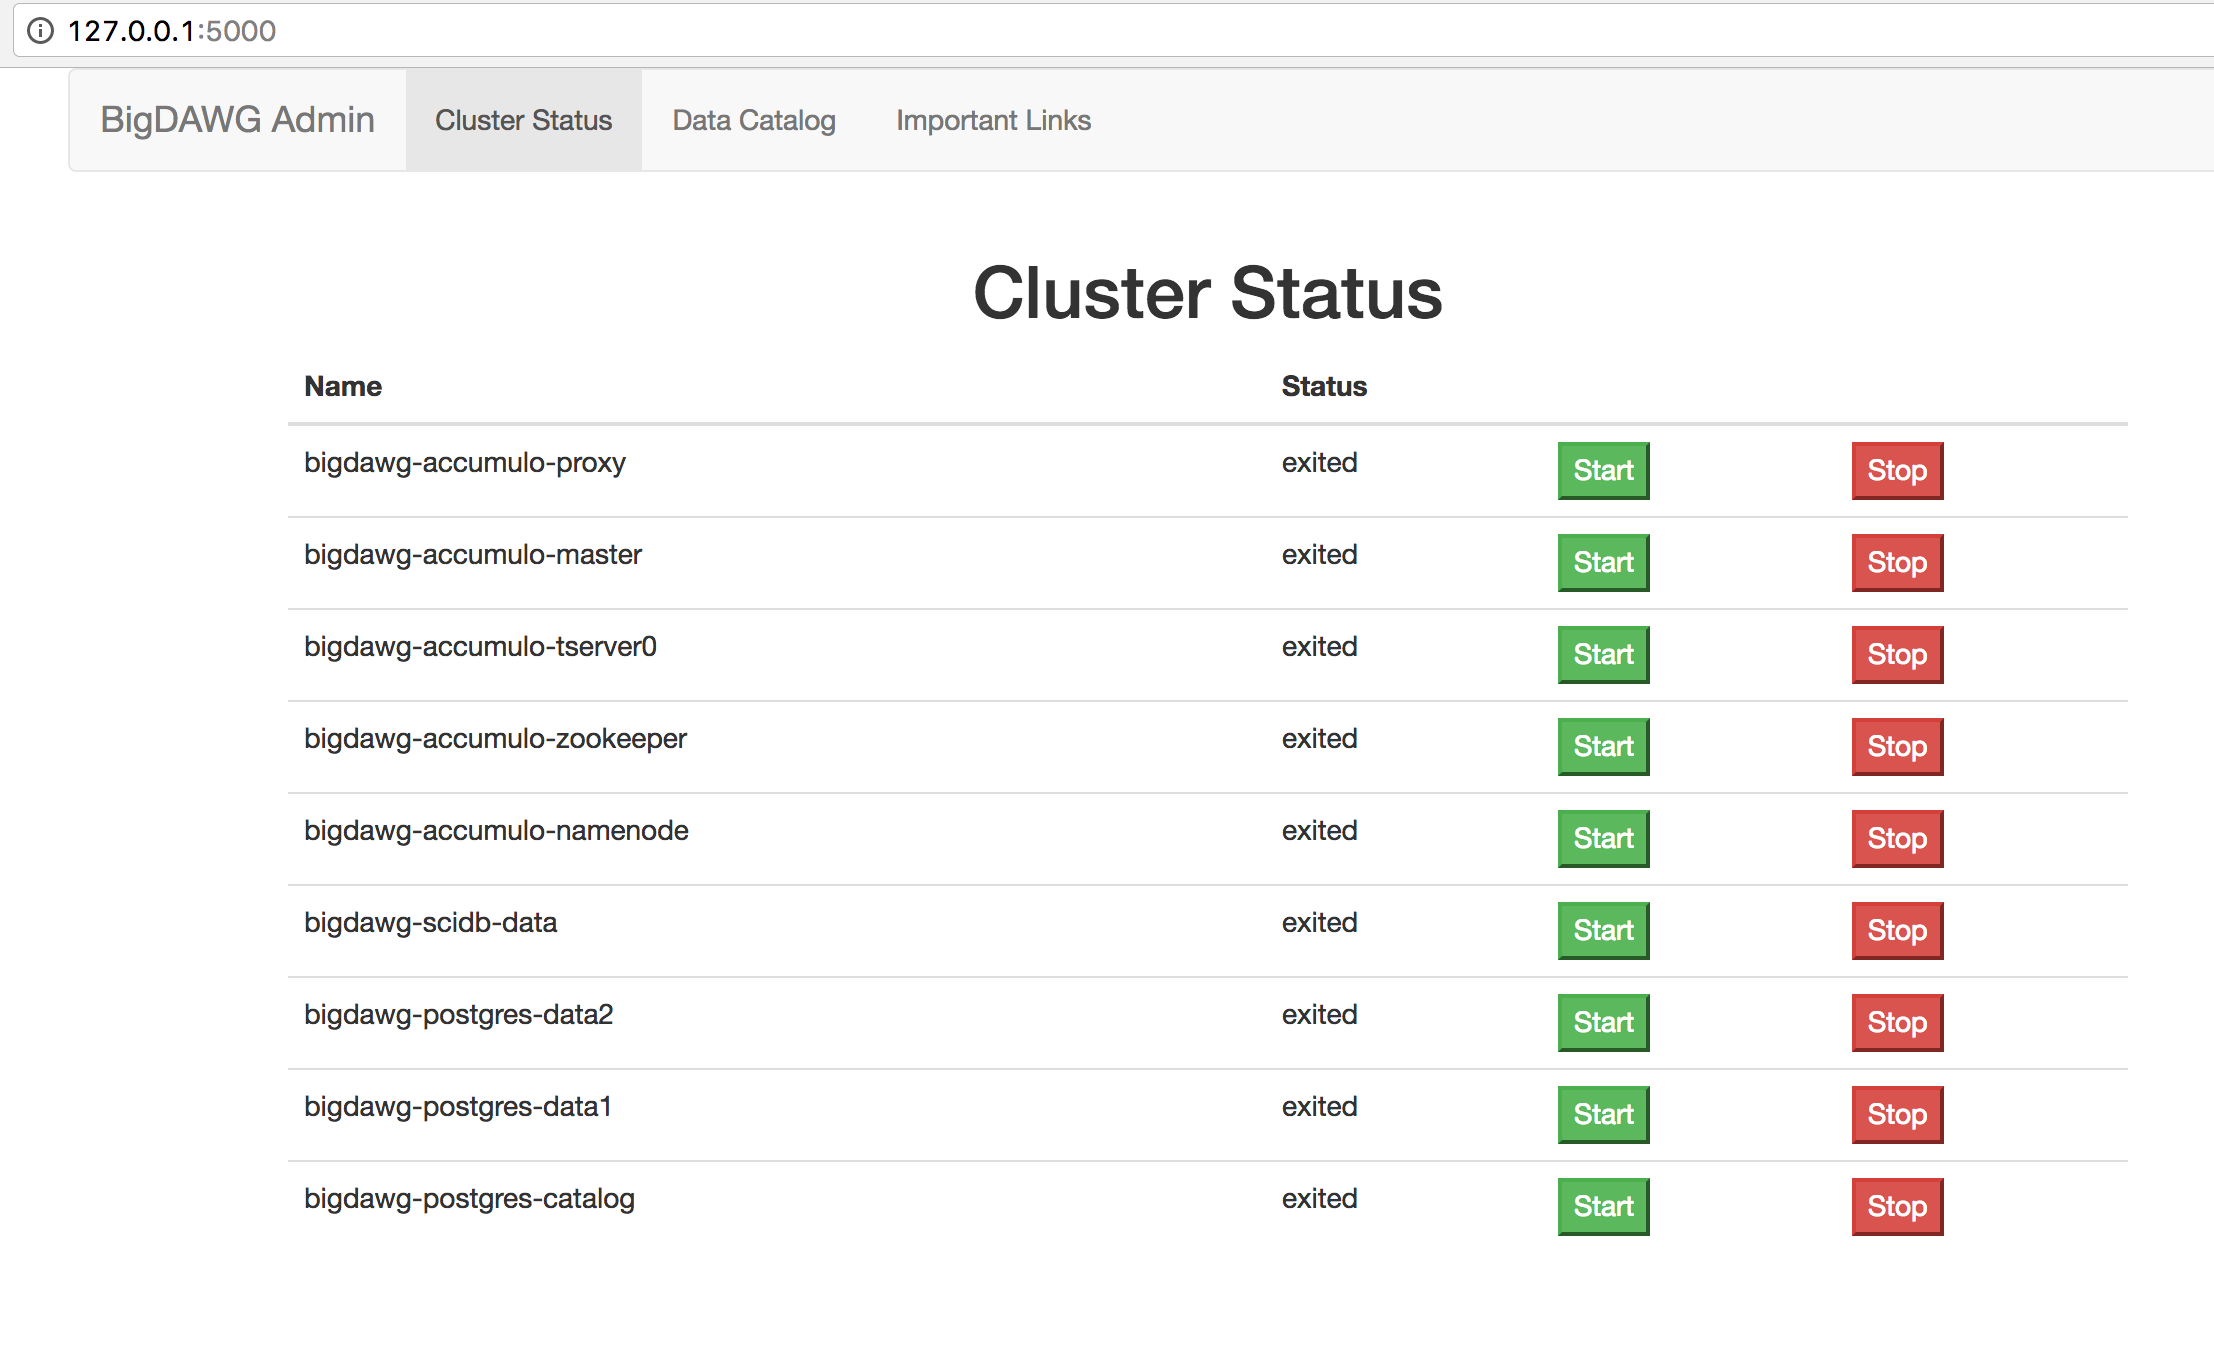
Container Status and Start/Stop Interface
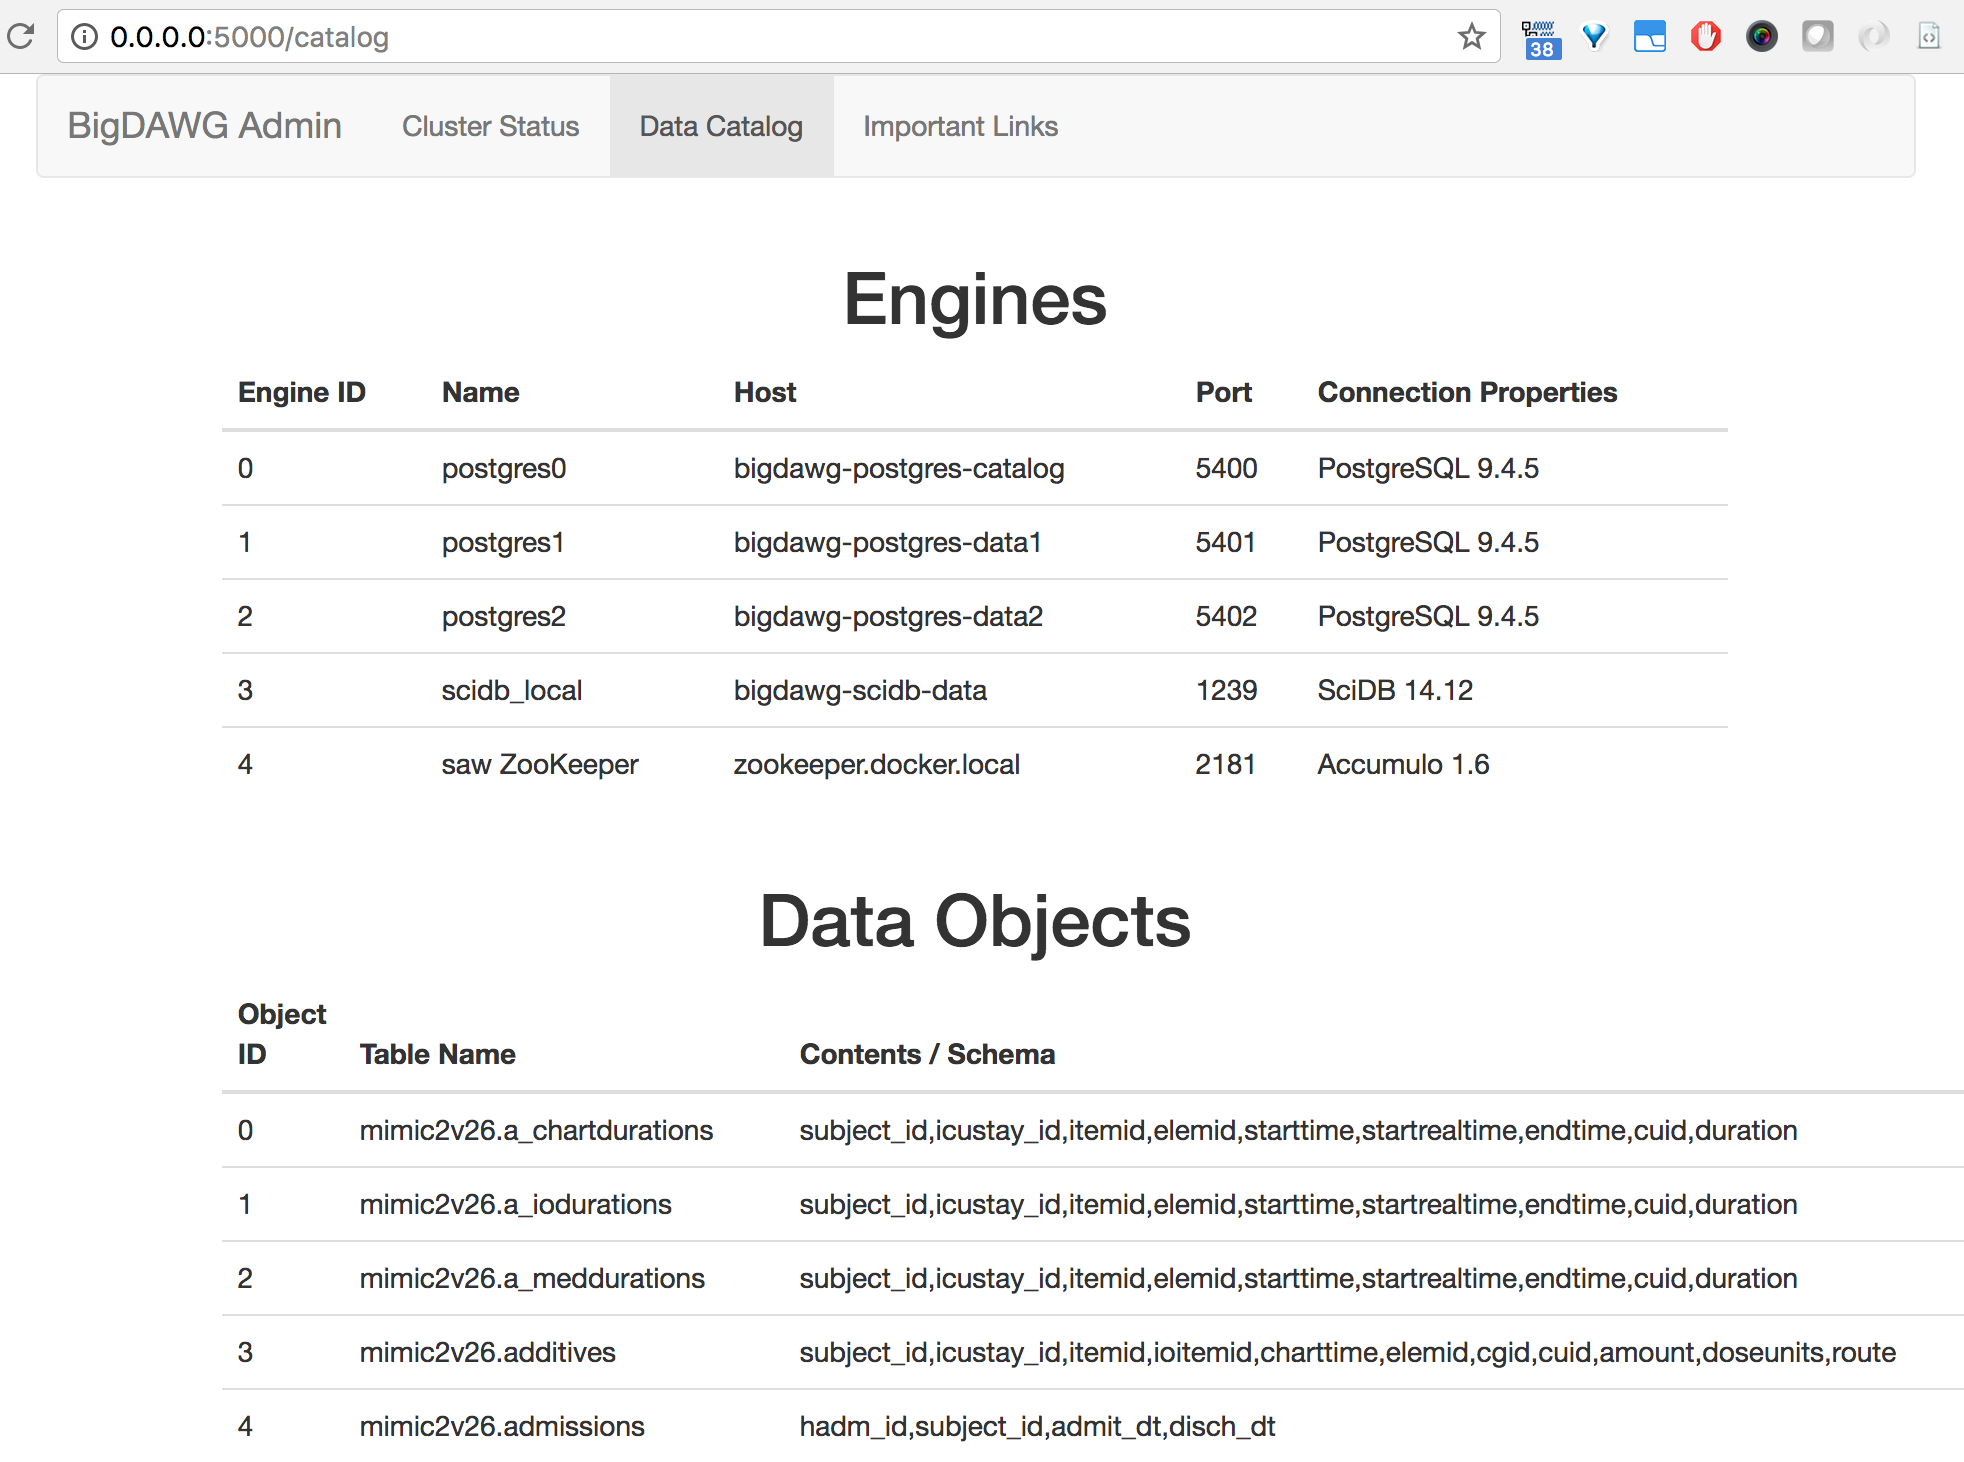
Catalog Objects Interface
2.9.1. Requirements:
You will need pip to install the python dependencies.
This interface has been tested with python versions 2.7.10, 2.7.11, and 3.5.2.
2.9.2. Installation instructions:
Note
If running on Mac or Windows, run the UI in a Docker Quickstart Terminal because Docker commands must be accessible by the Flask app.
Change directory to the “admin_ui” directory of the project root.
Install the python requirements with pip:
pip install -r requirements.txt
Edit the text file “catalog_config.txt” and configure the following credentials to connect to the Catalog database:
database=bigdawg_catalog
user=pguser
password=test
host=192.168.99.100
port=5400
Run the server with:
export FLASK_APP=app.py
flask run --host=0.0.0.0
The output will specify the local host and IP:
$ flask run --host=0.0.0.0
> * Serving Flask app "app"
> * Running on http://127.0.0.1:5000/ (Press CTRL+C to quit)
Navigate to the address shown above in a web browser and it will display the web interface.
Administrative Web Interface
See usage instructions in the administration section.